
How To Connect An Obihai Device To Anveo With SIP Credentials
Now with video instructions too!Published on
What is happening to Obitalk?
According to the recent OBITALK.com announcement, OBITALK services will be decommissioned and shut down on October 31, 2024. This means Google Voice will no longer work with Obihai devices.
Fortunately, Obihai devices work with Anveo, a popular VOIP service provider. And you can still connect your Obihai device to Anveo after Obitalk services are shut down.
Why Choose Anveo as Your VoIP Provider?
Anveo is a popular VoIP service provider with a proven 12+ year reliability track record and it is compatible with Obihai devices. Anveo's service is perfect for Residential and Business users. Anveo offers special subscription packages designed specifically for Obitalk users.
If you want to port your Google Voice phone number to Anveo and use your Obihai device, please see our guide on How to Port Your Google Voice Number to Anveo: A Step-by-Step Guide For Obihai Users.
Step-by-Step Guide to Connect Your Obihai Device To Anveo Using SIP Credentials
In this article, we'll walk you through the entire process of how to connect your Obihai device to Anveo using SIP credentials, to ensure you can continue using your Obihai device seamlessly without needing the Obitalk portal. We will cover how to sign up to Anveo, where to find Anveo SIP Credentials, and how to configure your Obihai device.
Anveo works with majority of Obihai devices, including but not limited to Obi100, Obi110, Obi200, Obi202, Obi312, Obi1000 series, and Obi2000 series.
Besides Obihai devices, Anveo also works well with all major desk phones and IP (SIP) phones like Obihai, Polycom, and Grandstream devices, and softphones such as Zoiper and Phonerlite.
You can follow along this guide by video as well
Step 1: Create Your Anveo Account
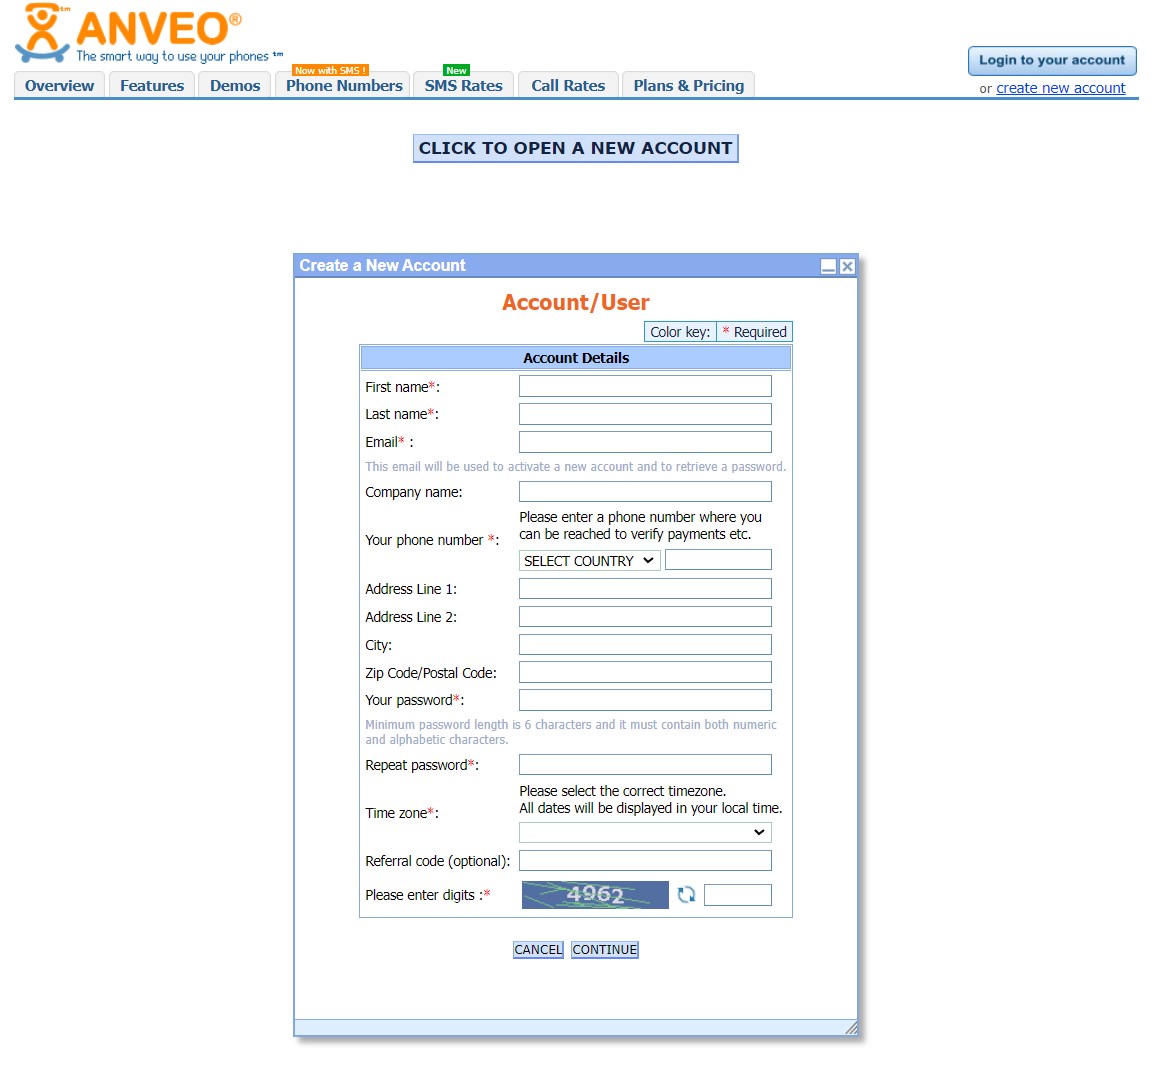
- Visit Anveo: Go to anveo.com, and in the top right corner click "Create a new account" and fill out the fields.
- Confirm Your Email Address: Once you've signed up, check your email inbox for a confirmation link from Anveo. If you don't see it, be sure to check your Spam or Junk or 'All Mail' folder. Click the link to confirm your email address.
- Log in to Your Anveo Account: After confirming your email, sign in to your new Anveo account by going to anveo.com and on the top right corner click "Access My Account".
Step 2: Find Anveo SIP Credentials
SIP credentials are a combination of a username and password that authenticate a SIP (Session Initiation Protocol) device or application with a VoIP service provider's server. To find your Anveo SIP credentials:
- In the 'My Account' menu at the top of the dashboard, click 'Account Preferences'
- Click 'SIP Device Registration' on the left
- Click "Activate SIP Access", and click "I agree"
You will then see your Anveo SIP Registration details, which contain everything you need to connect your Obihai device to your Anveo account.
You will need these SIP Username and SIP Password found in this section towards the end of the device configuration setup.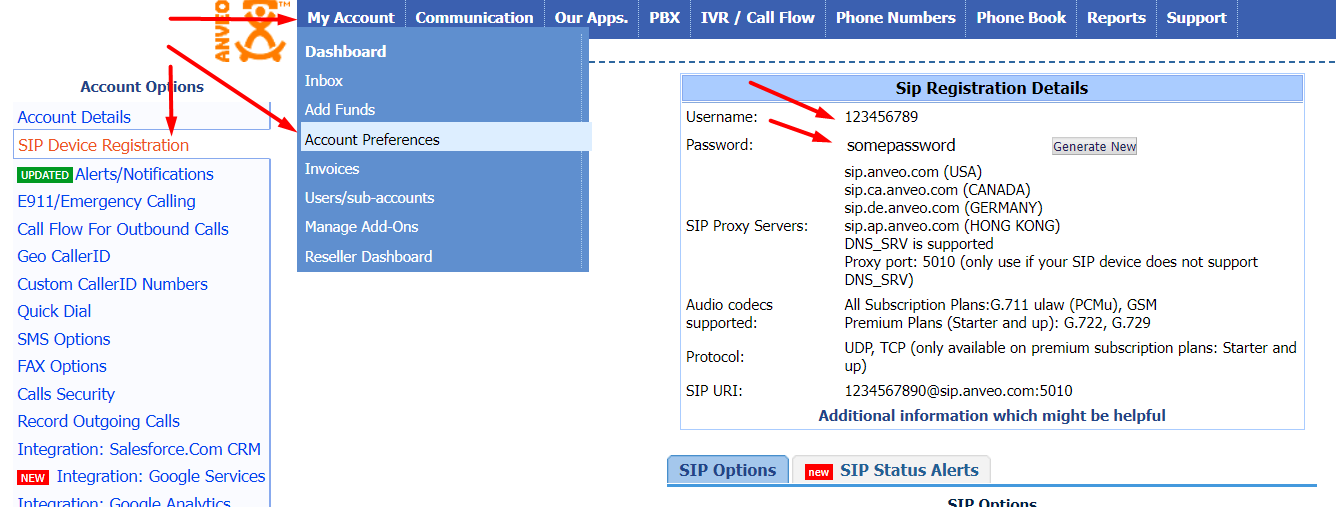
Step 3: Connect your Obihai device to Anveo
Now, it's time to connect your Obihai device to Anveo using your Anveo SIP credentials. Please note that the instructions may vary depending on the type of Obihai device you have. Please refer to your device administration guide for more details on how to connect your device.
Also notice that you must remove the checkmark from the "Default" column to make changes to some parameters
Prepare Device
- Make sure your Obihai device is powered on
- Connect one end of an Ethernet cable to the OBI internet port and other end of the Ethernet cable to an Ethernet port on your Internet Router or Switch
Factory Reset Device:
- Dial *** to access the Obi configuration auto-attendant
- Press 8 for "Restore Factory Default"
- Press 1 to confirm
- Hangup
- Unplug power cord from the device
- With a paper clip (or similar) depress the reset pin located at the bottom of the OBi.
- While keeping the reset pin depressed, plug-in the power cord. First, the Power LED will turn red, then become sold green. Keep depressing the reset pin while this is occurring.
- After 10 seconds, the Power LED will start to flash green (slowly). You may now release the reset pin.
- Within 5 seconds, the Power LED will start to flash green rapidly for about 3 seconds.
- Next the Power LED will change to red briefly indicating the OBi is now rebooting
Access Obihai Device Manager:
- From a phone attached to the OBi, dial *** to access the OBi configuration auto-attendant
- Choose "1" to hear the IP address of the OBi (will be something similar to 192.168.xxx.xxx)
- Open your favorite web browser on PC and enter the OBi IP address (that you just heard) in the URL address bar
- When prompted, enter "admin" for the username & "admin" for the password. If you already configured or have changed the login information before, use the changed login credentials
- From the phone connected to the Obi202, Dial *** to access the OBi configuration auto-attendant
- Press "0" for Advanced
- Enter 30# Check mark
- Press 1 to enter a new value
- Enter 1# to enable
- Press 1 to save
- Hangup
- Dial *** to access the OBi configuration auto-attendant
- Choose "1" to hear the IP address of the OBi (will be something similar to 192.168.xxx.xxx)
- Open your favorite web browser on PC and enter the OBi IP address (that you just heard) in the URL address bar
- When prompted, enter "admin" for the username & "admin" for the password. If you already configured or have changed the login information before, use the changed login credentials
Check that device reset successfully
- On the left, expand "Service Providers", and expand "ITSP Profile A", and click "General".
- Check that everything is set to Default. If you see anything that says "Google Voice", then the device did not reset correclty and you need to try to reset it again
Disable Obitalk portal Auto Provisioning:
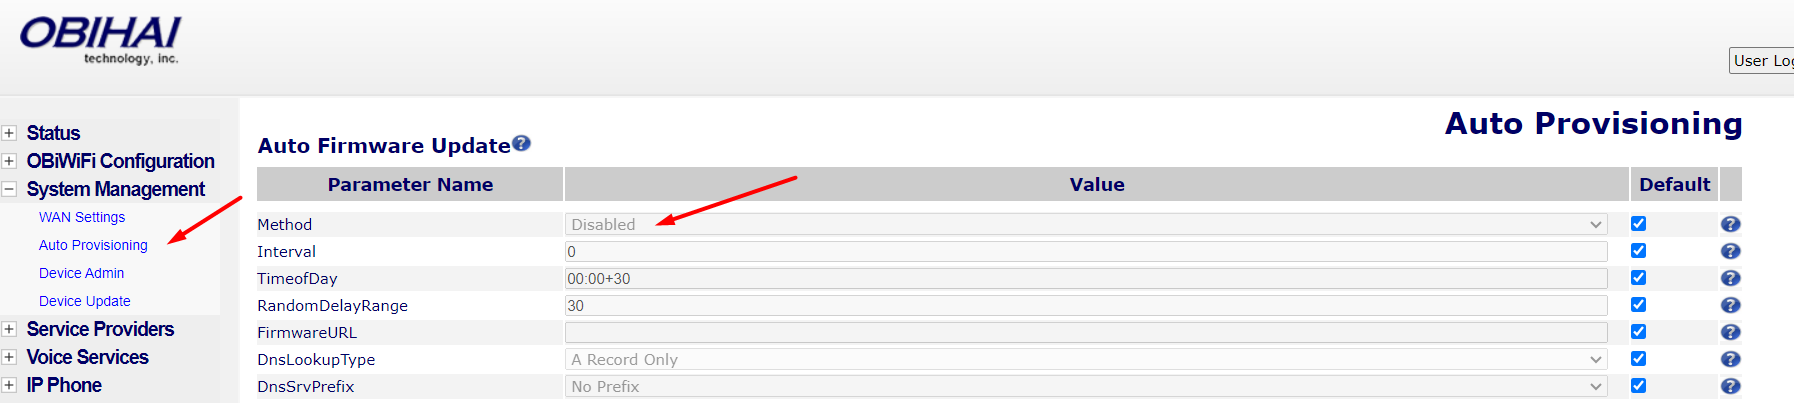
- On the left, expand System Management, and click "Auto Provisioning".
- Auto Firmware Update Section -> Method : Disabled
- OBiTALK Provisioning Section -> Method : Disabled
- Click Submit at the bottom to save the changes
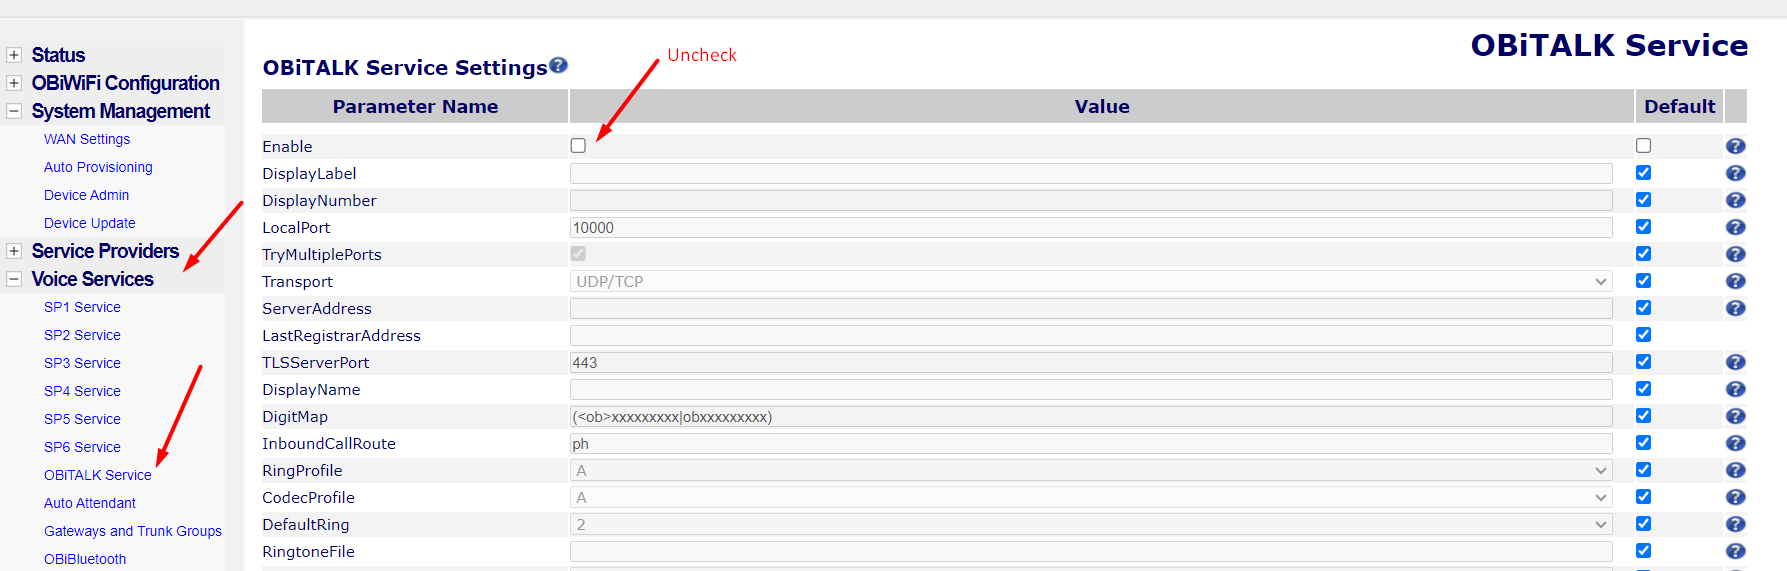
- On the left, expand Voice Services, and click "OBiTALK Services".
- For the "Enable" parameter, uncheck "Default" and uncheck the Enable value. So Enable should be unchecked.
- Scroll down to the bottom and click "Submit" to save the changes
Connect Device To Anveo:
- On the left, expand 'Service Providers'
- In that expanded section, expand 'ITSP Profile A'
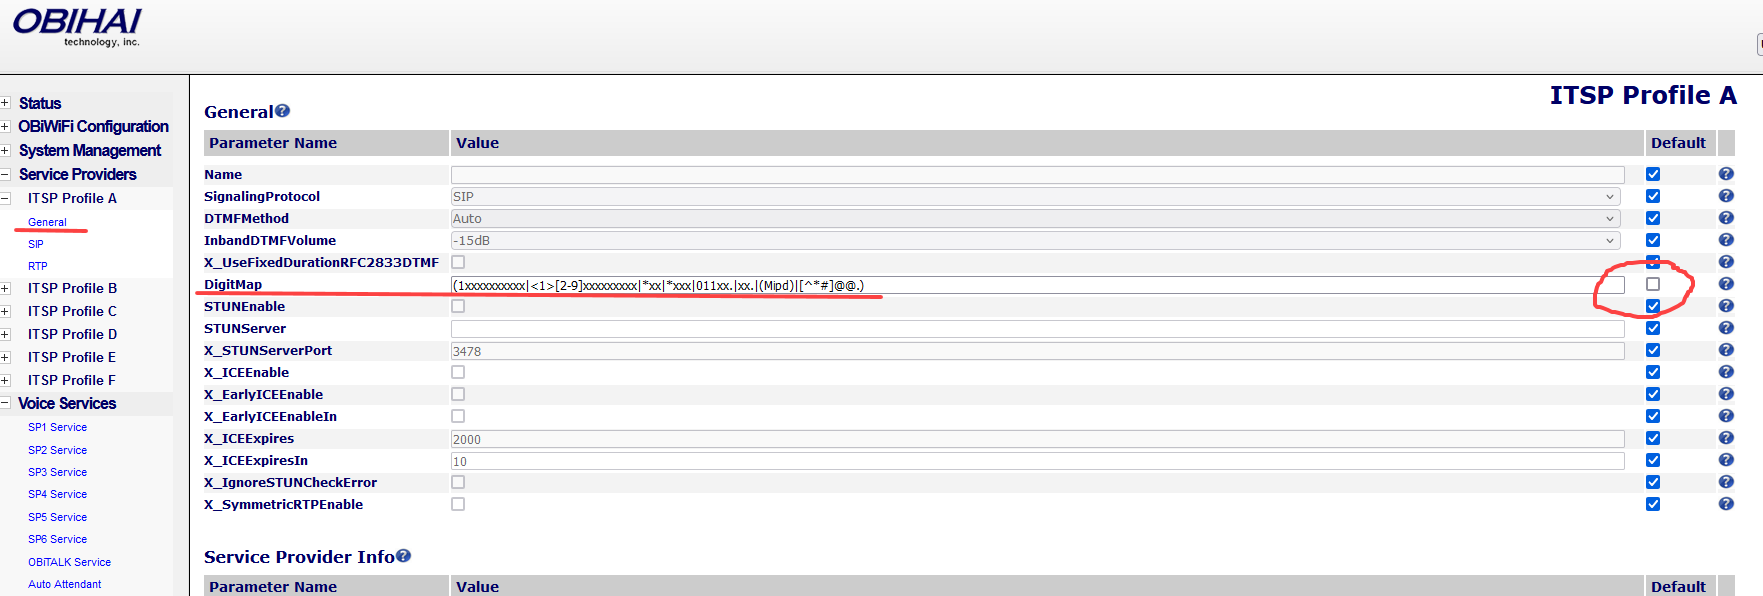
- In that expanded section, click 'General'
- Make sure that the 'SignalingProtocal' says "SIP". If not, uncheck Default checkmark and select 'SIP'
- Copy and paste the following into the "DigitMap" parameter:
Note: include the parentheses.
(1xxxxxxxxxx|<1>[2-9]xxxxxxxxx|*xx|*xxx|011xx.|xx.|(Mipd)|[^*#]@@.)
- Scroll down and click Submit button
- On the left, expand 'Service Providers'
- In that expanded section, expand 'ITSP Profile A'
- In that expanded section, click 'SIP'
- Configure the following parameters:
- ProxyServer: sip.anveo.com
- ProxyServerPort: 5010
- RegistrarServer: sip.anveo.com
- RegistrarServerPort: 5010
- RegistrationPeriod: 360
- RegisterExpires: 360
- Scroll down and click Submit button
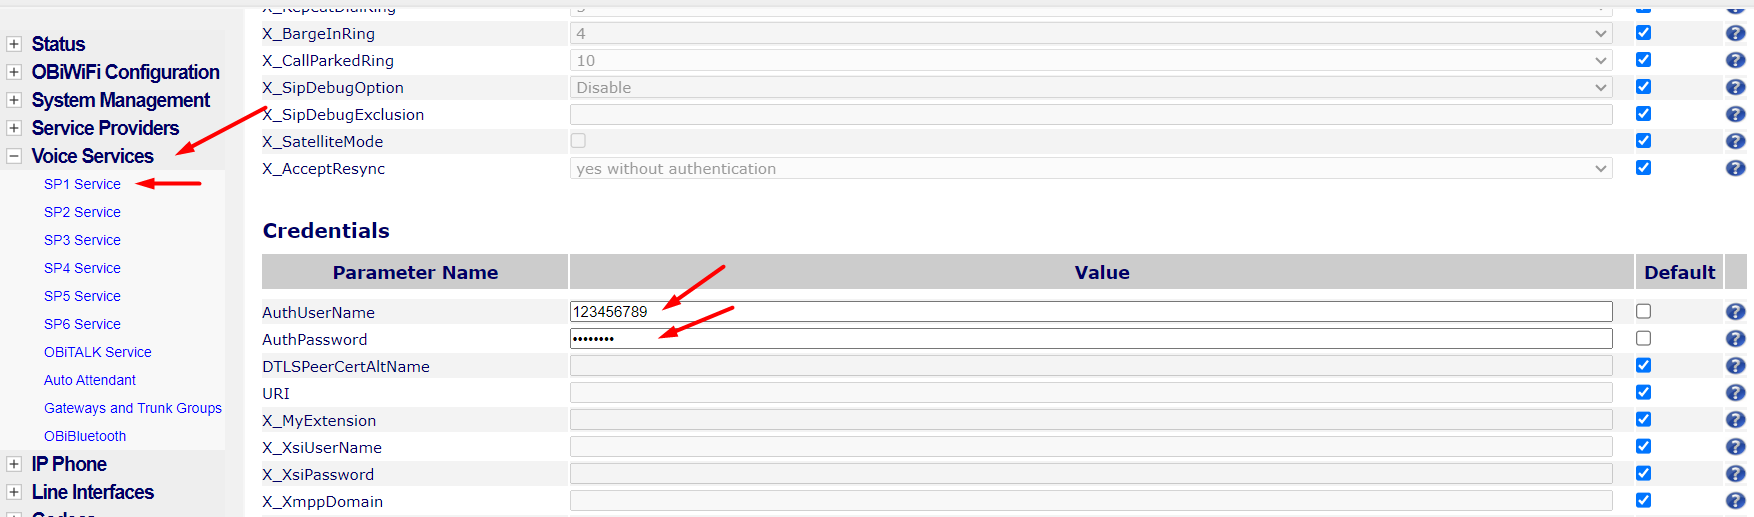
- On the left, expand 'Voice Services'
- In that expanded section, click "SP1 Service"
- Scroll down to the "Credentials" section
- In the "AuthUserName", enter your Anveo SIP "Username" found on Anveo's SIP Registration Page (In a new window, go to anveo.com => login to your account => in the 'My Account' menu click 'Account Preferences' => on the left click SIP Device Registration.)
- In the "AuthPassword", enter your Anveo SIP "Password" found on Anveo's SIP Registration Page (In a new window, go to anveo.com => login to your account => in the 'My Account' menu click 'Account Preferences' => on the left click SIP Device Registration.)
- Scroll down and click Submit button
Some devices have an easy way of factory resetting the device using a phone connected to the device. To reset the device using a phone, using the phone connected to the Obihai device, do the following steps:
The power LED (left most LED on Obi200) will turn red, then turn green, then flash green, and then turn solid green again.
If this method is not available for your device, or the method did not work, please follow the manual reset method:
Make sure the Obihai device is turned on, and is connected to an internet router with an Ethernet cable.
For the majority of Obi devices, please do the following to access the Obihai device web interface:
For Obi202, please follow these steps to enable the GUI Web Interface:
Before you proceed, please check that the device correclty reset by checking that the parameters are reset.
You should now be able to see the Obi Web Interface. In order to make sure there will be no conflicts between this Manual configuration and the Obihai dashboard, please perform the following steps to disable auto-provisioning:
Now you can actually connect your device to Anveo
Configure the ITSP Profile General settings:
Configure the ITSP Profile SIP settings:

Configure the Voice Service settings:
Now Reboot the device by clicking the "Reboot" button on the top right
For more information please see: OBiDeviceAdminGuide.pdf (Archived)
And that is it! Try dialing *91 (note there is no prompt, so after dialing wait 10 seconds before you speak to hear an echo) to access Anveo's echo test. If your device is successfully connected to Anveo, after 5 minutes you will see the SIP Status "Active" on Anveo's SIP Device Registration page.
Now you can either port an existing number, order a new number, configure E911 etc.
Troubleshoot Method 1
Important: First, please make sure to wait a few minutes for the device to connect to Anveo. The status on Anveo's website may take up to 5 minutes to register that the device is connected.
Important: Please try dialing *91 echo test. There is no prompt for the echo test. So try speaking about 10 seconds after you call *91 to hear your echo.
Important: If you went through the configuration but saw configurations relating to Google Voice scattered in between, the device did not reset correctly and you need to start again from the beginning and make sure that the device resets correctly.
If you know you reset the device fully and almost all of the parameters are set to Default after the reboot, please follow the following steps to try to troubleshoot the connection
Step 1: Configure ITSP Profile B
Configure the ITSP Profile B General settings:
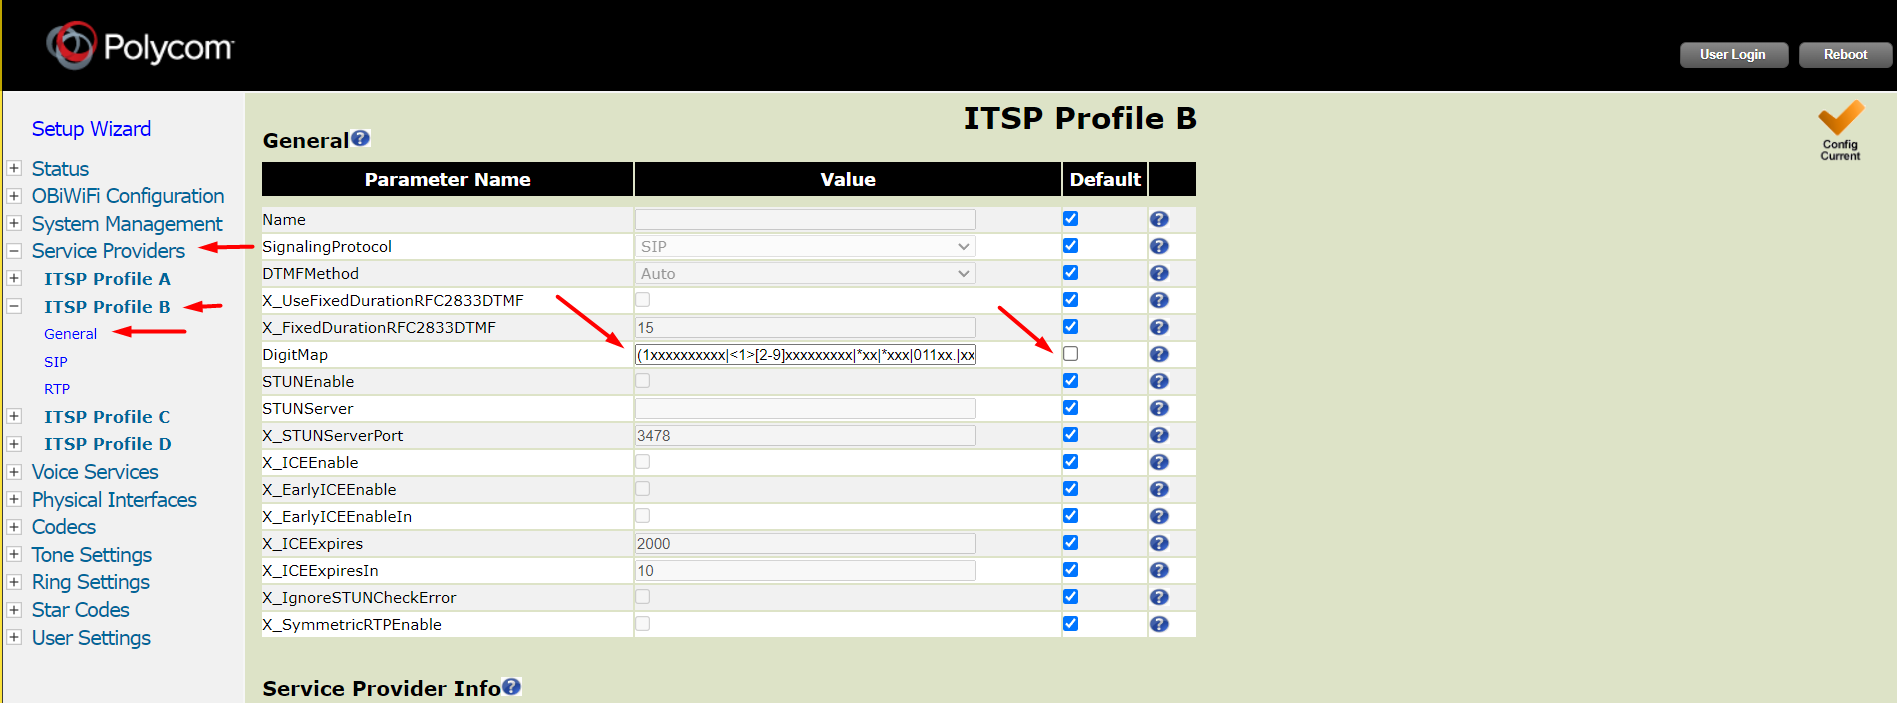
- On the left, expand 'Service Providers'
- In that expanded section, expand 'ITSP Profile B'
- In that expanded section, click 'General'
- Make sure that the 'SignalingProtocal' says "SIP". If not, uncheck Default checkmark and select 'SIP'
- Copy and paste the following into the "DigitMap" parameter:
Note: include the parentheses.
(1xxxxxxxxxx|<1>[2-9]xxxxxxxxx|*xx|*xxx|011xx.|xx.|(Mipd)|[^*#]@@.)
- Scroll down and click Submit button
Configure the ITSP Profile SIP settings:
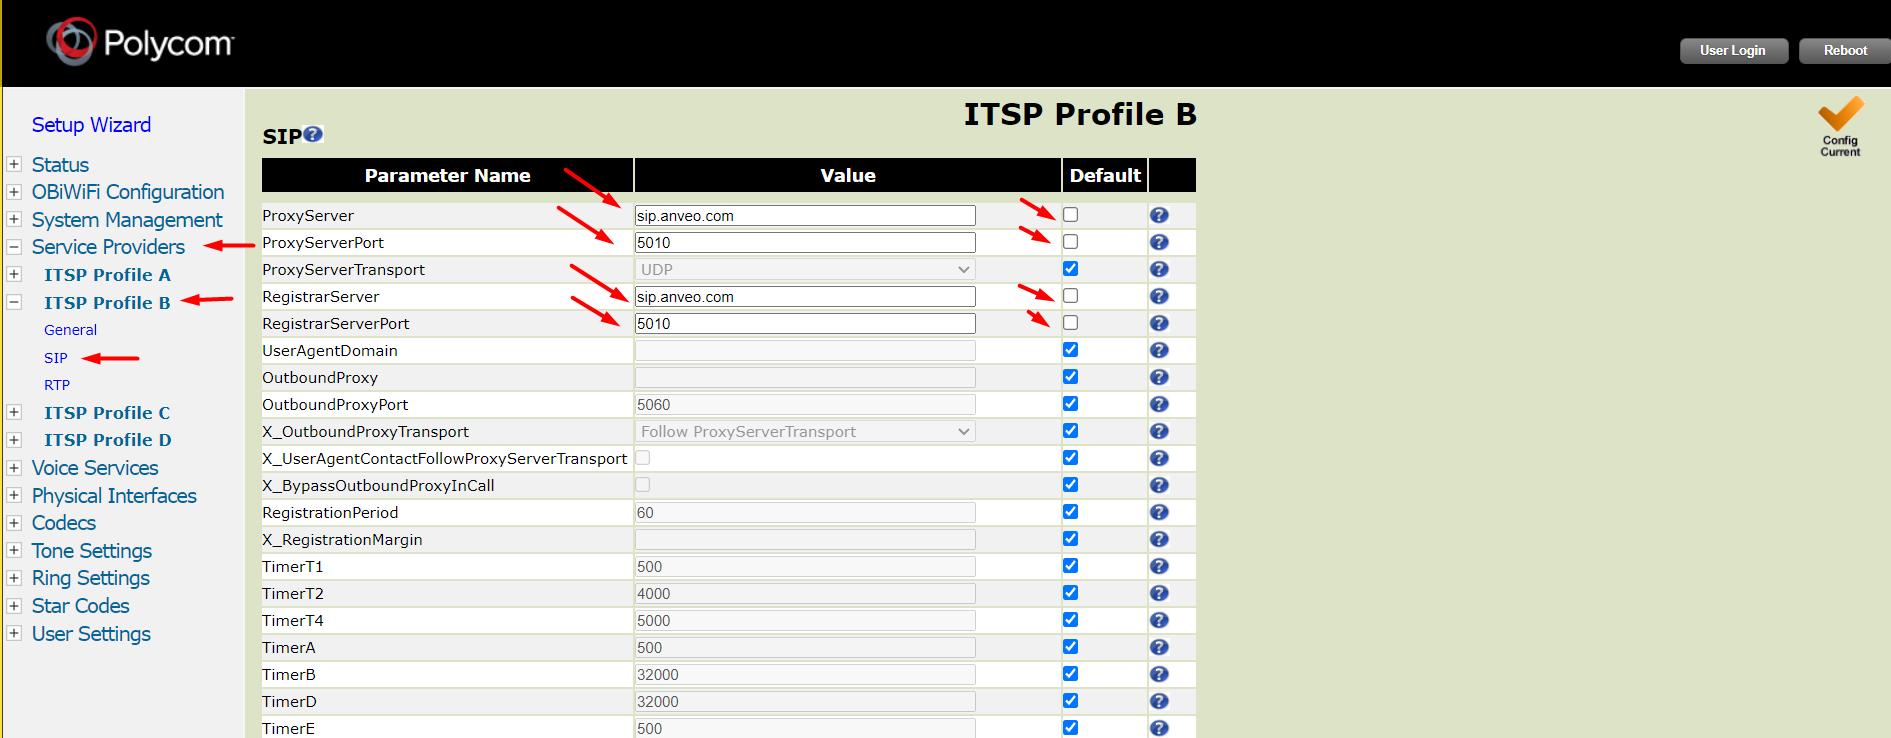
- On the left, expand 'Service Providers'
- In that expanded section, expand 'ITSP Profile B'
- In that expanded section, click 'SIP'
- Configure the following parameters:
- ProxyServer: sip.anveo.com
- ProxyServerPort: 5010
- RegistrarServer: sip.anveo.com
- RegistrarServerPort: 5010
- RegistrationPeriod: 360
- RegisterExpires: 360
- Scroll down and click Submit button
Configure the Voice Service settings:
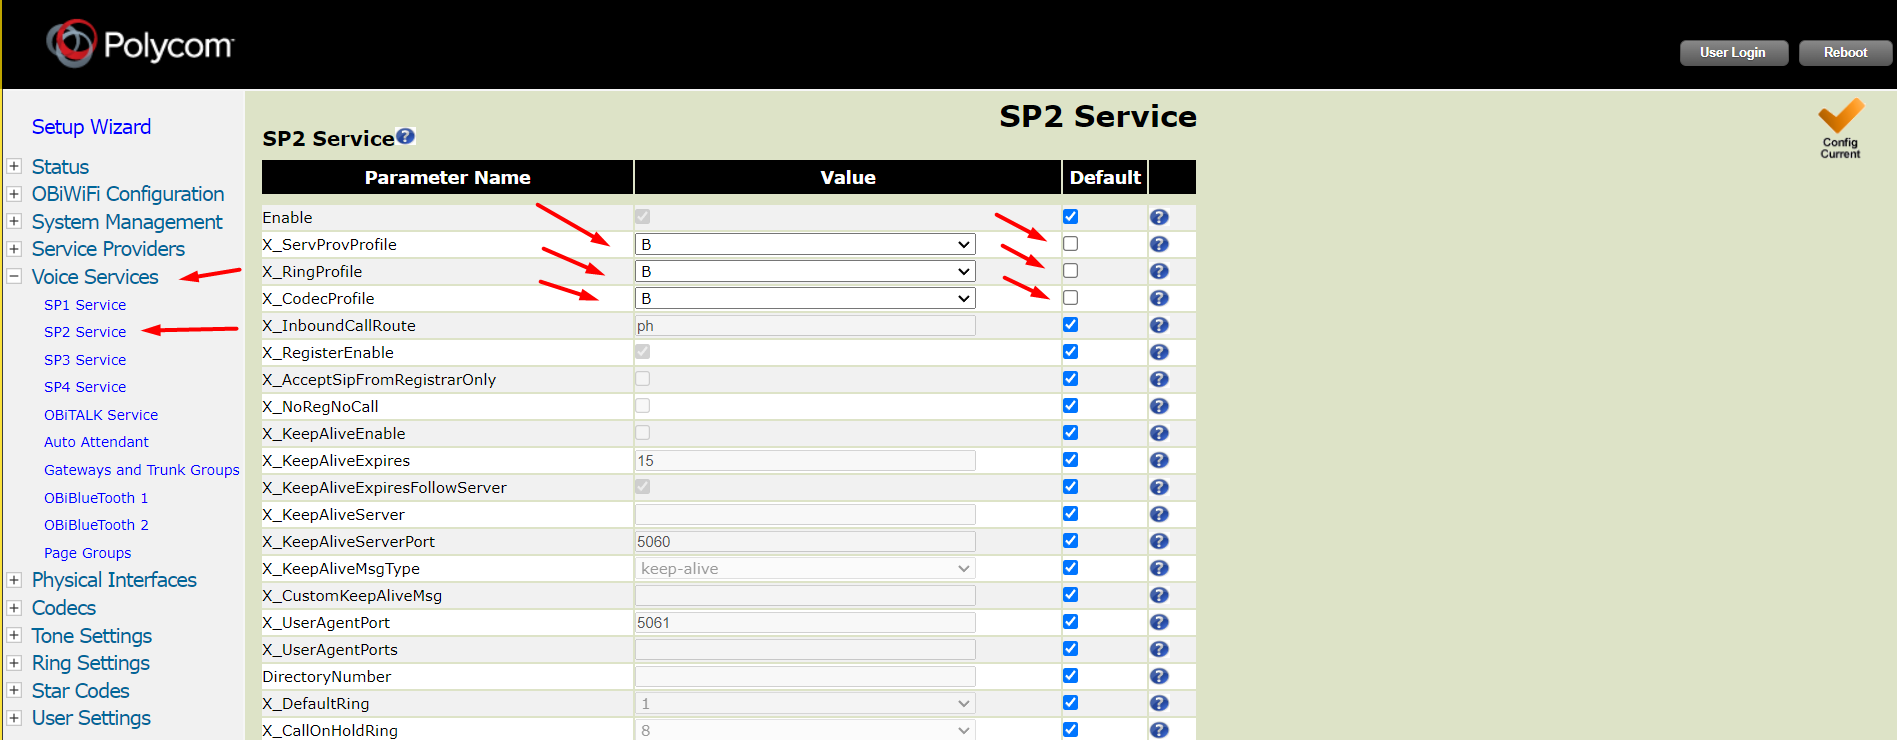
- On the left, expand 'Voice Services'
- In that expanded section, click "SP2 Service"
- Set X_ServProvProfile to "B"
- Set X_RingProfile to "B"
- Set X_CodecProfile to "B"
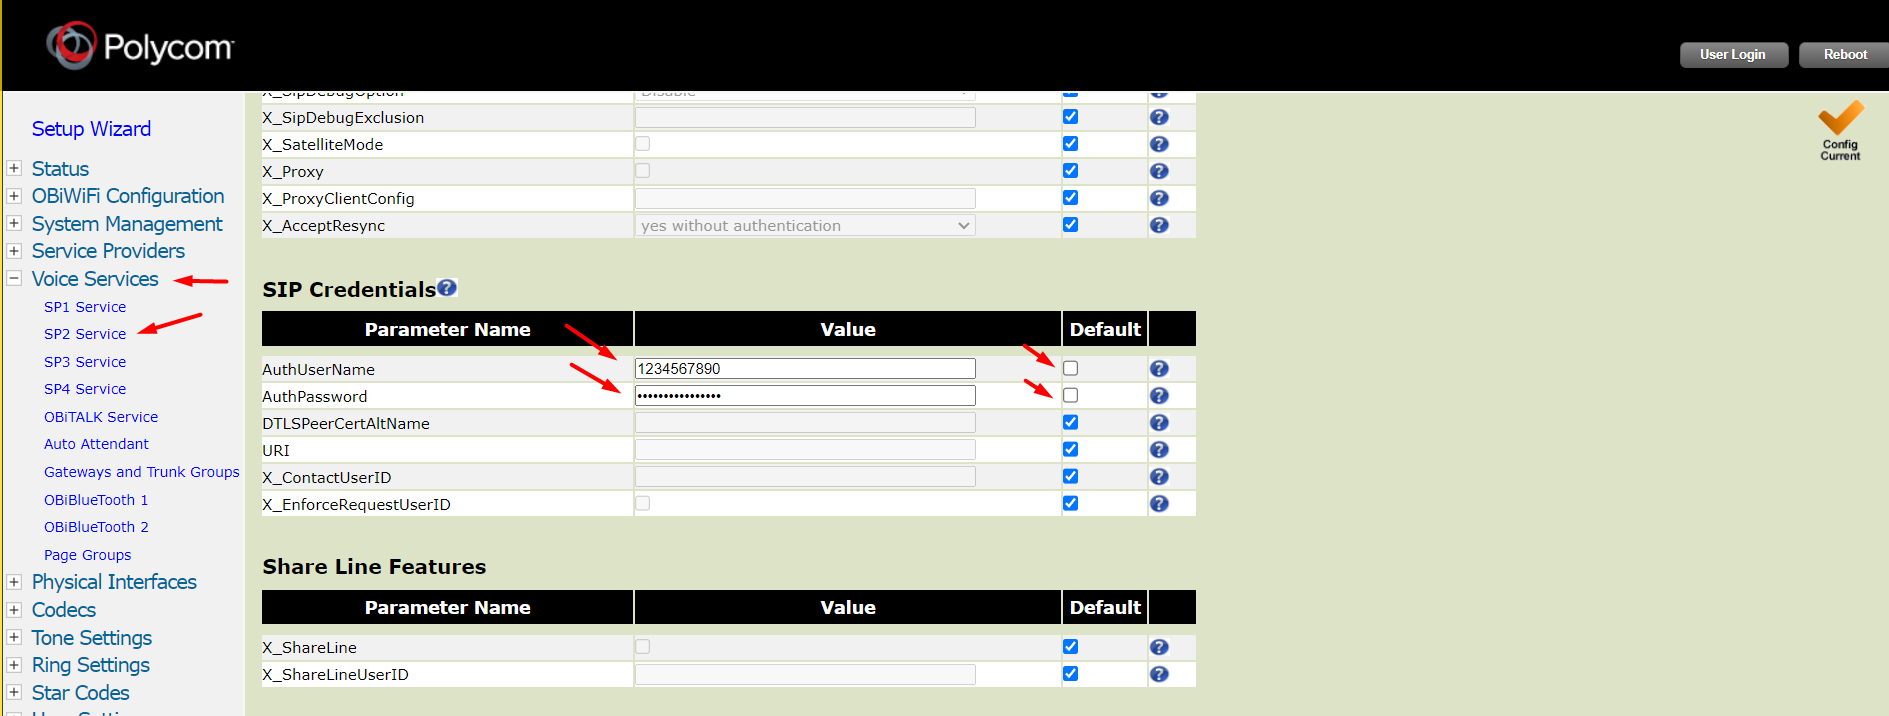
- Scroll down to the "Credentials" section
- In the "AuthUserName", enter your Anveo SIP "Username" found on Anveo's SIP Registration Page (In a new browser window, go to anveo.com => login to your account => in the 'My Account' menu click 'Account Preferences' => on the left click SIP Device Registration.)
- In the "AuthPassword", enter your Anveo SIP "Password" found on Anveo's SIP Registration Page (In a new browser window, go to anveo.com => login to your account => in the 'My Account' menu click 'Account Preferences' => on the left click SIP Device Registration.)
- Scroll down and click Submit button
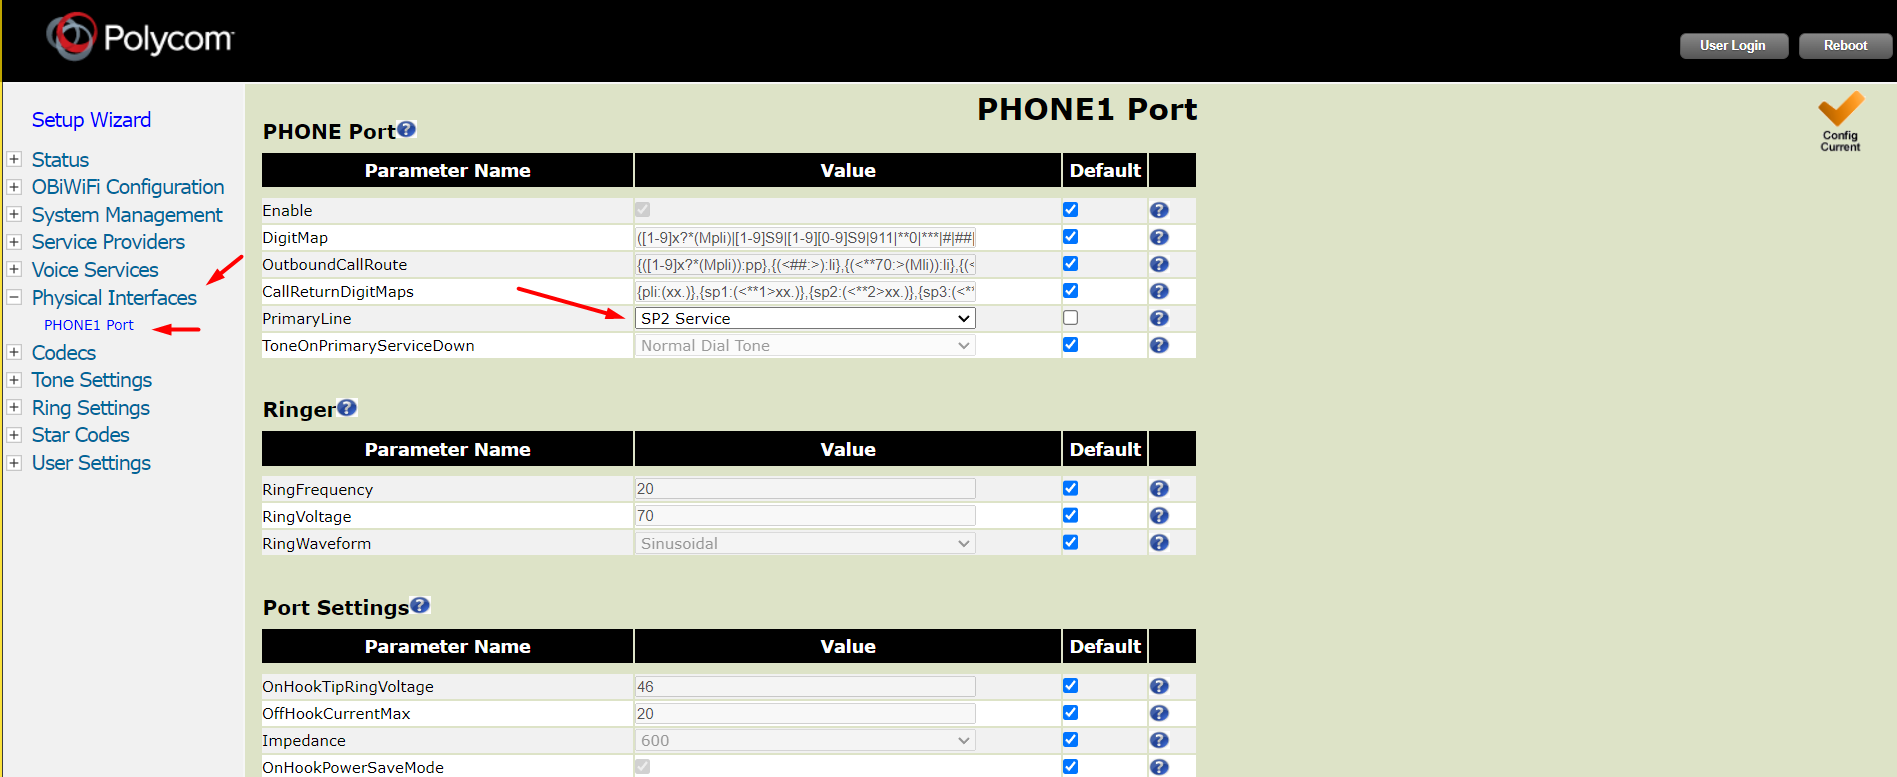
Configure which SP service to use:
- On the left, expand 'Physical Interfaces'
- In that expanded section, click "PHONE1 Port"
- Set "PrimaryLine" to "SP2 Service"
- Scroll down and click Submit button
Now try dialing *91 for the echo test.
Next Steps
- If you have an Obihai device and are a residential customer, you want to get Anveo's special Obitalk package. To port a Google Voice number to Anveo and get Anveo's special Obitalk package, please read our article on How to Port Google Voice for Obitalk.
- If you do not have an Obihai device, please follow our guide on how to port a Google Voice number to Anveo here.
Need Help? We're Here for You!
If you have any questions or need assistance at any point, don't hesitate to reach out. Our support team is ready to help you make this transition as smooth as possible.
Frequently Asked Questions
Q: What is Aveno? Are you Aveno or Anveo?
A: On the recent OBITALK.com announcement, Obitalk misspelled Anveo. They meant to write Anveo. In that article, Aveno is Anveo.
Q: I need help configuring my Obihai Device. Can you help me?
A: If you have trouble connecting your device, please submit a support ticket from your account dashboard (Support Menu on the top right, click "Support Tickets", and create a new free ticket), describe the problem, and our technical team will try to help you setup.